Strength
Training for Runners Trying to Lose Weight
By Andrew J. Greenhalgh Updated September 2026
If you’re running to lose weight, strength training can help you preserve muscle and build strength alongside your runs. This guide gives you a straightforward two-day routine, clear exercise demonstrations and research-backed advice on balancing lifting with running and recovery. Whether you’re a beginner, returning after a break or an experienced runner looking for a manageable strength routine, this guide is for you.
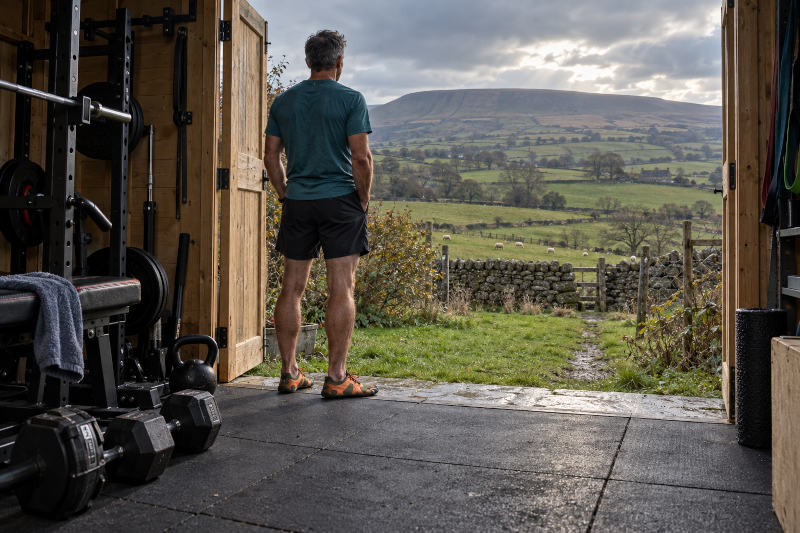
Build strength that leaves room for the running you enjoy.
This guide draws on published research, with references and links so you can explore the evidence yourself. You’ll find a practical two-day plan with illustrated instructions, home and gym options, and advice on resistance, progression and recovery. We’ll also examine what strength training can contribute to weight loss and why the scales may not tell the whole story.
The routine puts these research findings into practice, giving you a manageable starting point you can adapt as you progress. I’ll also draw on my training diaries to show what worked for me—and what left my legs struggling to recover—while keeping personal observations distinct from the published evidence.
Start with a small, repeatable amount. Progress when both the exercises and your running feel manageable. Judge the result by more than the bathroom scales.
For the full picture, read the guidance on strength training, weight loss and recovery before starting. Already familiar with it? Jump to the two-day strength routine, with exercise diagrams and instructions.
What strength training adds to weight loss
When you eat less to lose weight, you can lose muscle as well as fat. Resistance training challenges your muscles and helps preserve them during weight loss. A 2025 review of 25 trials found that adding resistance training to dietary weight loss helped preserve fat-free mass and increased fat loss, even though total weight loss was not significantly greater. The participants had overweight or obesity issues; the research was not specifically about runners. [1]
In other words, strength training may help you lose more fat and retain more lean tissue, even if your total weight falls no faster. This does not necessarily mean you are gaining muscle: “fat-free mass” includes muscle, water, bones and organs.
My own experience brought this distinction home in early 2017. While following German Volume Training, I noticed that I looked leaner and more muscular, particularly during February and March, although my weight changed very little. I was also following a ketogenic diet, so I cannot say how much each contributed. The change in my appearance was noticeable, but it did not establish exactly how much fat I had lost or muscle I had gained.
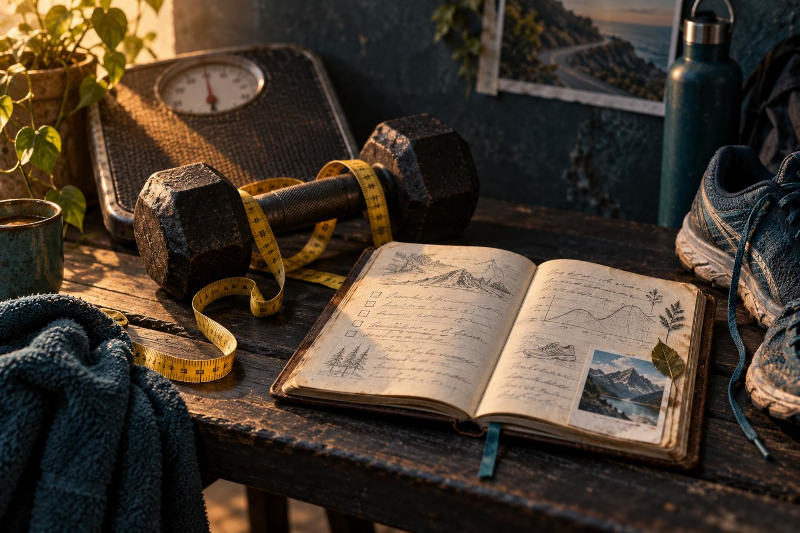
The scale is one measure. Strength, measurements and how you feel add context.
How much strength training should you start with?
Two sessions offer a practical way to build a routine. ACSM’s 2026 guidance recommends resistance training at least twice weekly, involving all the major muscle groups. It also recognises that useful improvements can come from different approaches, including home training and resistance bands. Two days is guidance for healthy adults—not a scientifically established minimum for every runner trying to lose weight. [2]
For most of my running life, running came first and strength training fitted around it. I used a multigym to strengthen my legs, alongside upper-body and core exercises. My journals from around 2010–2015 record two light sessions a week, lasting about 30 minutes each. Sometimes I lifted on running days and sometimes on separate days, adjusting around my training. I do not recall this leaving me too tired or sore to run well. This guide takes the same approach: manageable strength work that supports your running and leaves room for recovery.
Make the effort useful
Choose resistance that makes the final repetitions challenging while you can still control the movement. Once familiar with an exercise, finishing with roughly two or three good repetitions left is a useful guide. You do not need to take every set to failure. [2]
For your first one or two sessions, use one comfortable set of each exercise below. Learn the movements and see how your legs respond. Build towards two working sets if recovery is good. This familiarisation step and the precise sets and repetitions are practical starting choices, not a trial-tested formula for fat loss.
Rest for around 90 seconds to two minutes between sets, or longer if you still feel out of breath or too tired to perform the next set with good technique. The aim is to challenge your muscles with controlled repetitions. Give yourself enough recovery so that you do not have to stop simply because you rushed from one exercise to the next.
Allow roughly 30–40 minutes once you reach two sets, including a few minutes of easy movement and lighter practice repetitions. If that is too much initially, keep the sessions shorter. A routine you can repeat gives you something to build on.
What about running faster?
Strength training can improve running economy—the energy needed at a given pace—but the evidence is strongest for certain methods in trained runners. We should not assume an introductory routine will produce the same results as heavy lifting or plyometrics used in performance studies. [3]
A simple two-day strength routine
This routine contains two separate whole-body sessions: Day A and Day B. Complete them on different days, preferably with at least one recovery day between them.
During each session, work through all six exercises in the order shown. Where alternatives are given, choose one version only. For example, perform either a chair squat or goblet squat, and either a wall press-up, counter press-up or machine chest press.
For your first one or two sessions, complete one comfortable set of each exercise. Once you know how your body responds, build towards two sets of each exercise. For example, 2 × 8–12 means:
- Perform 8–12 controlled repetitions.
- Rest for around 90 seconds to two minutes.
- Perform another 8–12 repetitions.
- Move to the next exercise.
For exercises that work one side at a time, complete the stated repetitions on each side before resting. Move only as far as feels comfortable and controlled. Make sure any chair, bench or step you use cannot slide or tip, and keep breathing rather than holding your breath.
Day A
Complete all six exercises:
Chair or goblet squat → glute bridge → press-up or chest press → row → standing calf raise → dead bug.
Day B
Complete all six exercises:
Romanian deadlift → low step-up or split squat → press-up or chest press → row → seated calf raise → suitcase carry.
The press and row appear on both days deliberately. You may use the same versions each time; there is no need to learn a different variation for every session.
In each diagram, FINISH shows the end of the working movement. Return to the starting position under control to complete one repetition.
If you are managing an injury, discuss any necessary changes with your physiotherapist rather than adding the routine unchanged to your rehabilitation programme.
For additional beginner demonstrations, see the NHS strength exercises and ACE glute bridge guide.
Day A · Chair squat or goblet squat
2 sets of 8–12 repetitions
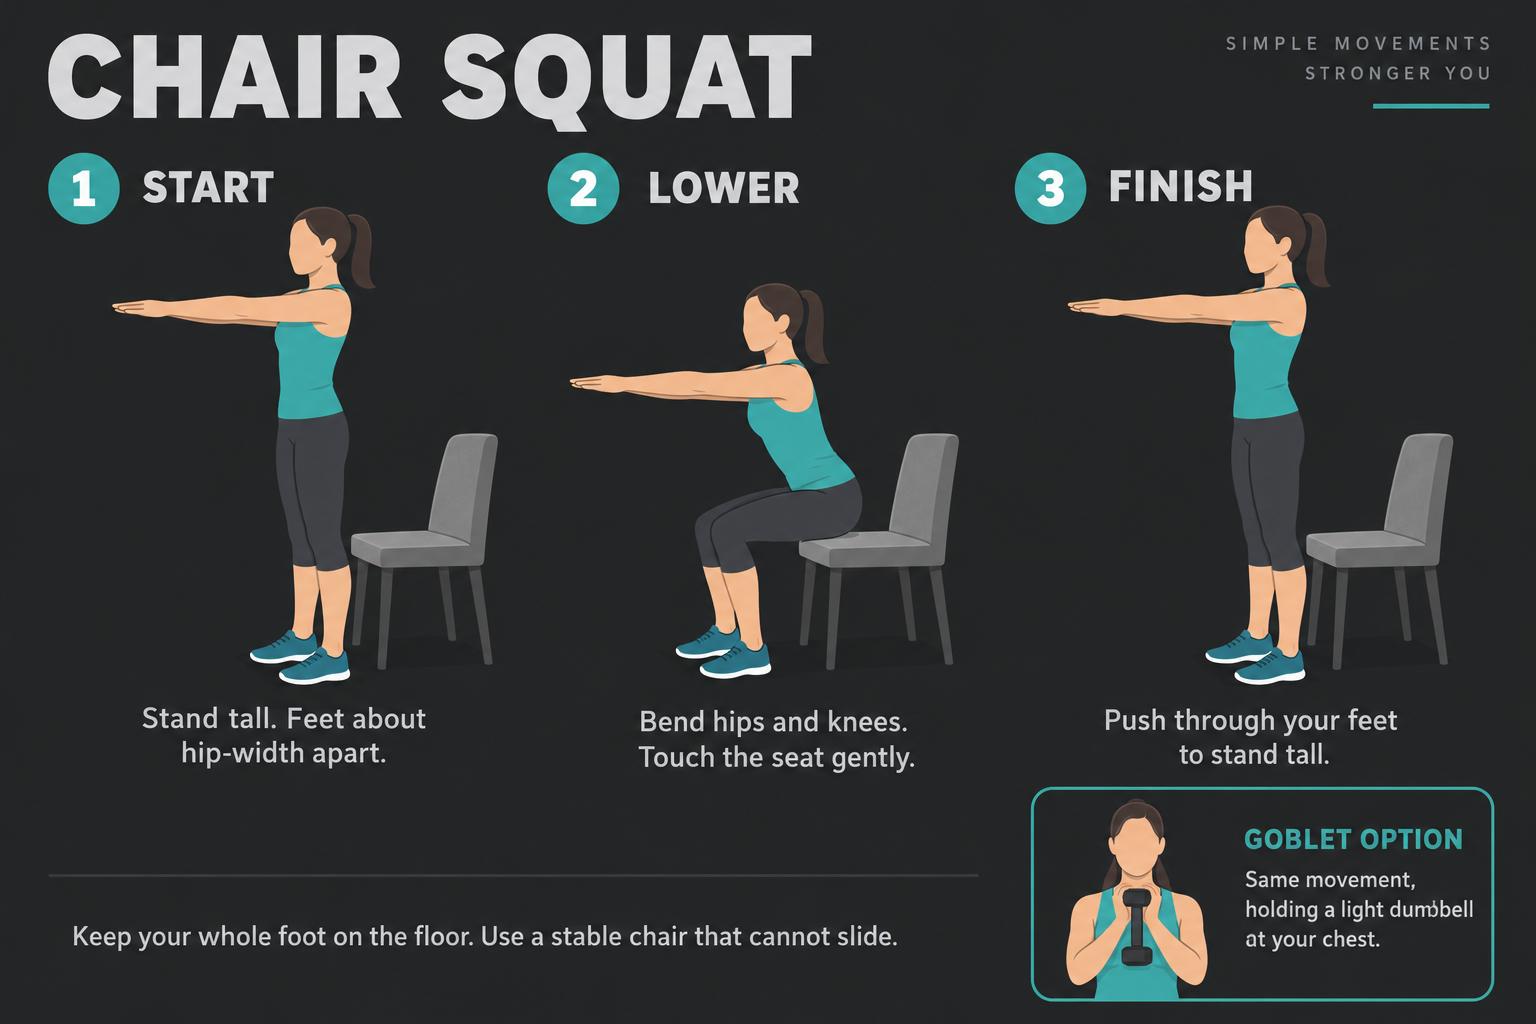
Lower towards the chair, then return to standing. Choose bodyweight or the goblet option.
Start: Stand just in front of a sturdy chair secured against a wall, feet about hip-width apart. Reach your arms forwards for balance.
Move: Bend your hips and knees to lower your bottom towards the seat. Keep your whole foot planted and let your knees follow the direction of your toes. A slight forward lean is normal.
Return: Touch the seat gently, then push through your feet to stand tall. Lowering and standing again counts as one repetition.
Easier: Sit fully before standing again, or use a higher stable seat. Use light hand support if needed; avoid dropping into the chair.
Goblet option: Repeat the same movement holding a light dumbbell vertically at your chest with both hands. Keep it close to your body. Add weight only when the bodyweight version feels controlled.
Day A · Glute bridge or Hip Thrust
2 sets of 8–12 repetitions
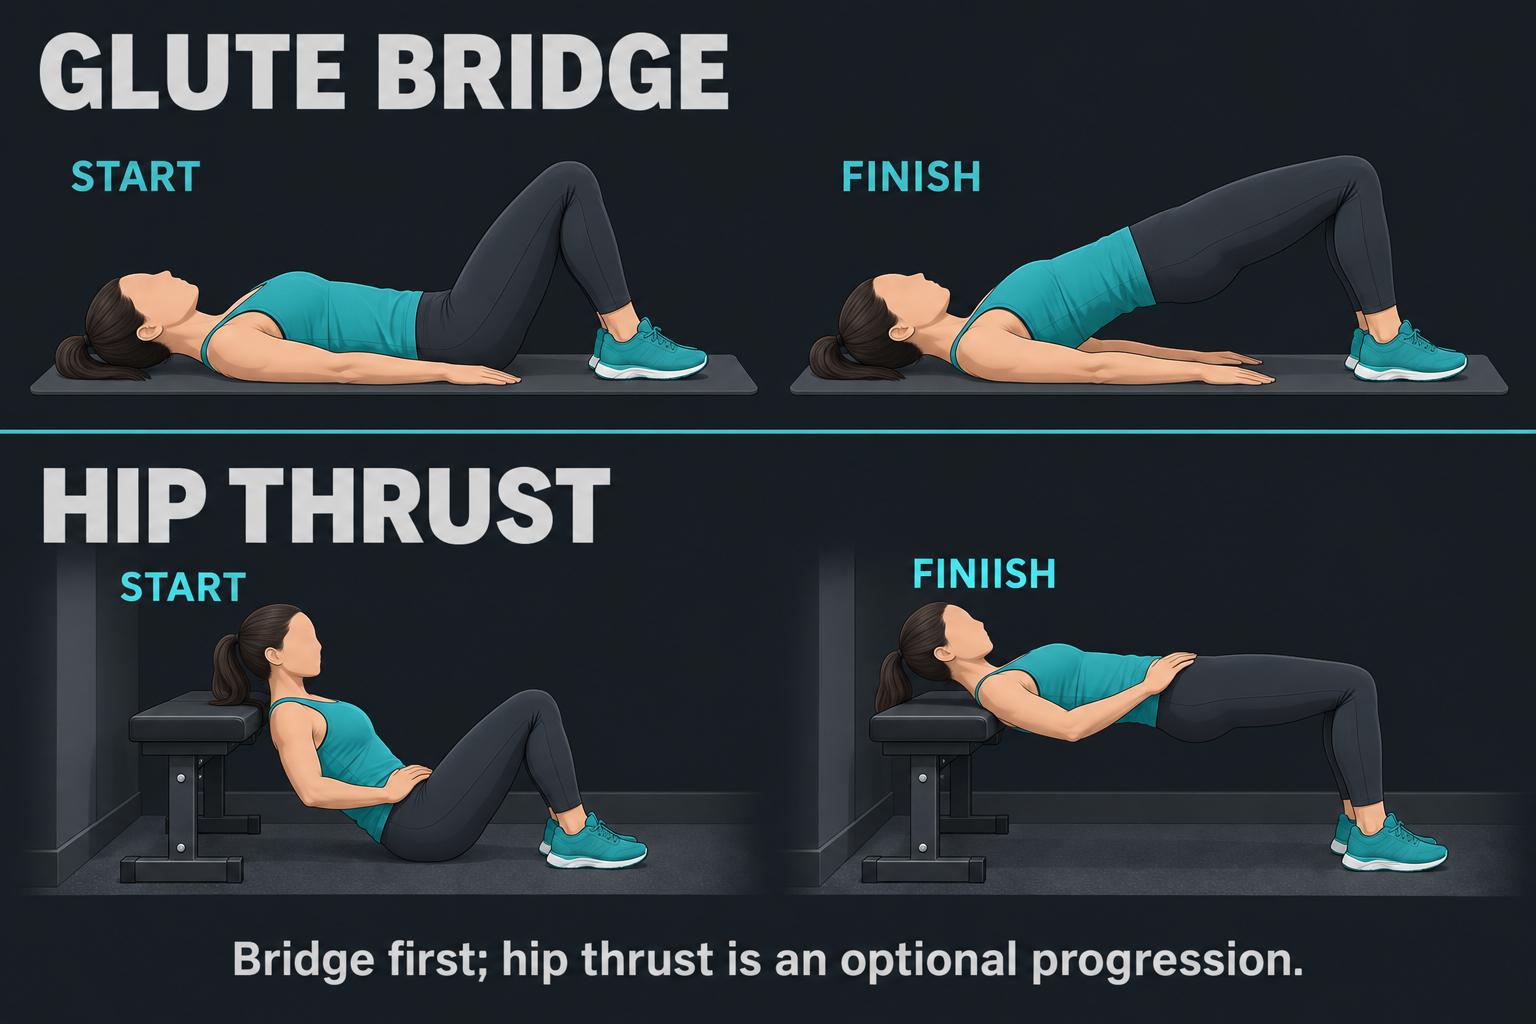
Bridge: shoulders stay on the floor. Hip thrust: upper back rests on a secured bench.
Glute Bridge: Lie on your back with knees bent and feet flat, about hip-width apart. Rest your arms beside you and gently tighten your tummy.
Lift and return: Press through your feet and squeeze your buttocks to lift your hips. Stop when your shoulders, hips and knees roughly line up; do not chase height by arching your lower back. Lower slowly. That is one repetition.
Easier: Use a smaller lift while keeping your pelvis level. Keep both feet down.
Hip-thrust option: Rest your upper back against a padded bench that cannot slide or tip, with feet planted and hips lowered. Push through your feet to raise your hips until your torso is roughly level and knees are above ankles. Keep your chin gently tucked; lower under control.
Progression: Learn the hip thrust without weight first. Later, a light dumbbell can rest across the hip crease on padding, held securely with both hands. Stay with the floor bridge if the bench setup feels awkward.
Day A · Press-up or chest press
Choose one option: 2 sets of 6–12 repetitions
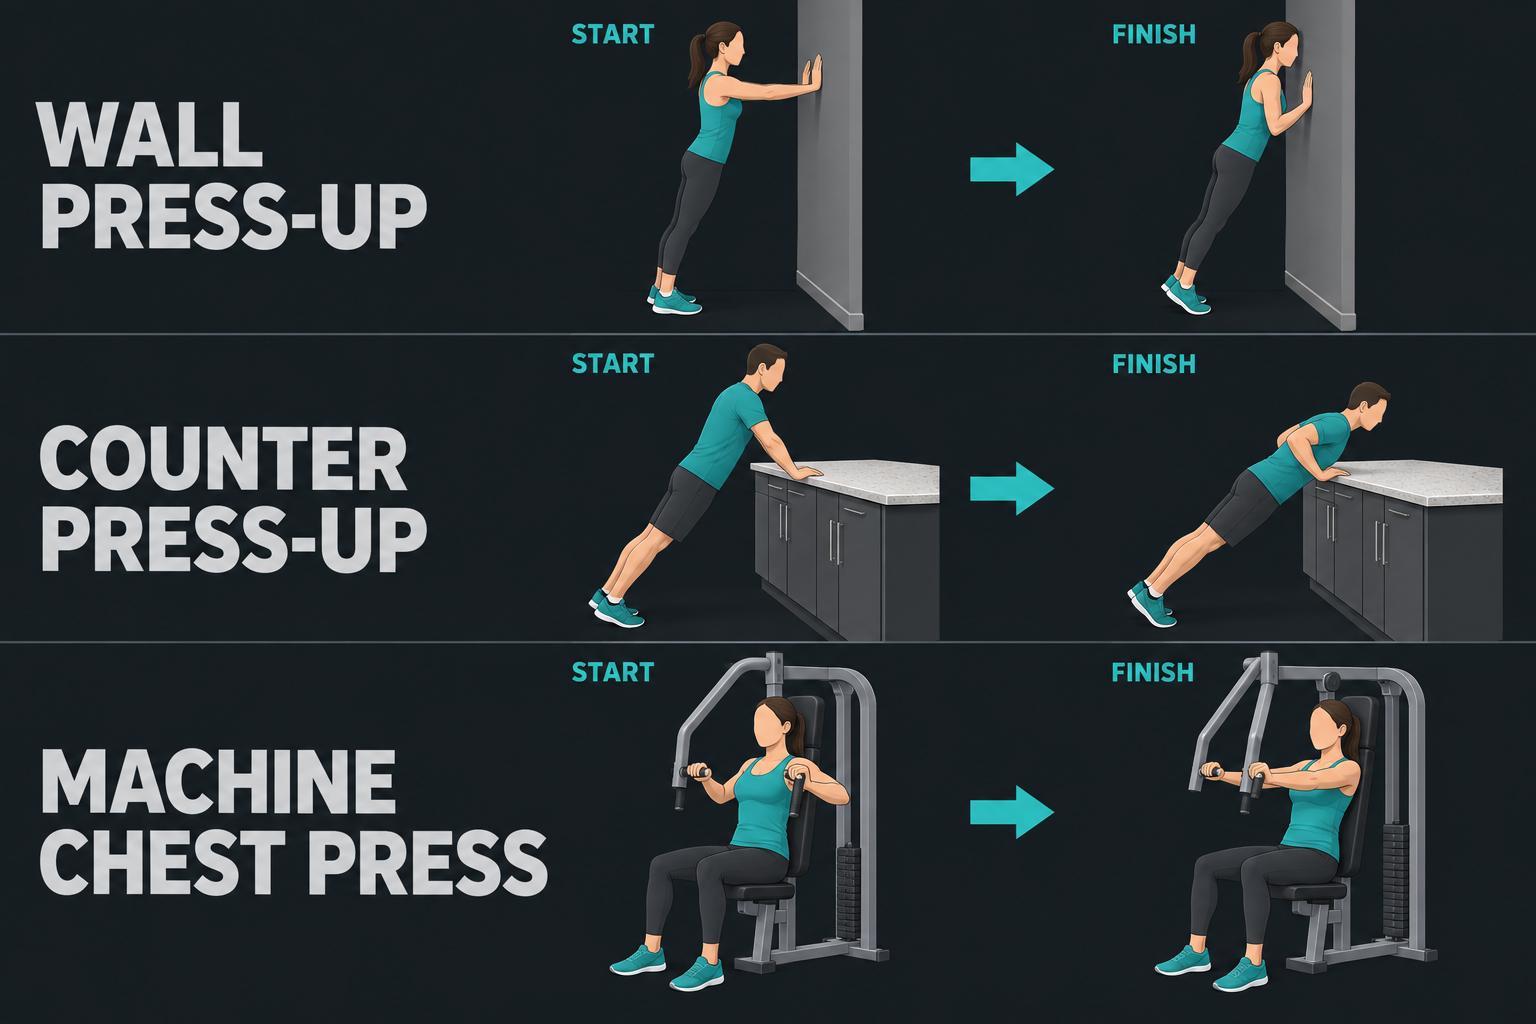
Wall press-up, counter press-up or machine chest press: choose one pushing exercise.
Wall press-up: Place your hands on a wall at about chest height, slightly wider than your shoulders. Step back until your body leans towards the wall. Bend your elbows to bring your chest closer, then press away. Keep your body moving as one unit, without sagging at the hips.
Counter press-up: Use the same movement with hands on a fixed, sturdy counter. Walk your feet back so your body forms a straight sloping line. Lower your chest towards your hands, elbows angled back rather than flared sideways, then press up. A higher hand position is usually easier.
Machine chest press: Adjust the seat so the handles sit around mid-chest height. Keep your back supported and feet flat. Press the handles forwards without snapping your elbows straight, then return slowly without letting the weights crash.
Count: One controlled lowering-and-pressing cycle is one repetition. For the machine, press out and return once. Ask for help adjusting an unfamiliar machine.
Day A · Row
2 sets of 8–12 repetitions; each side for the one-arm row
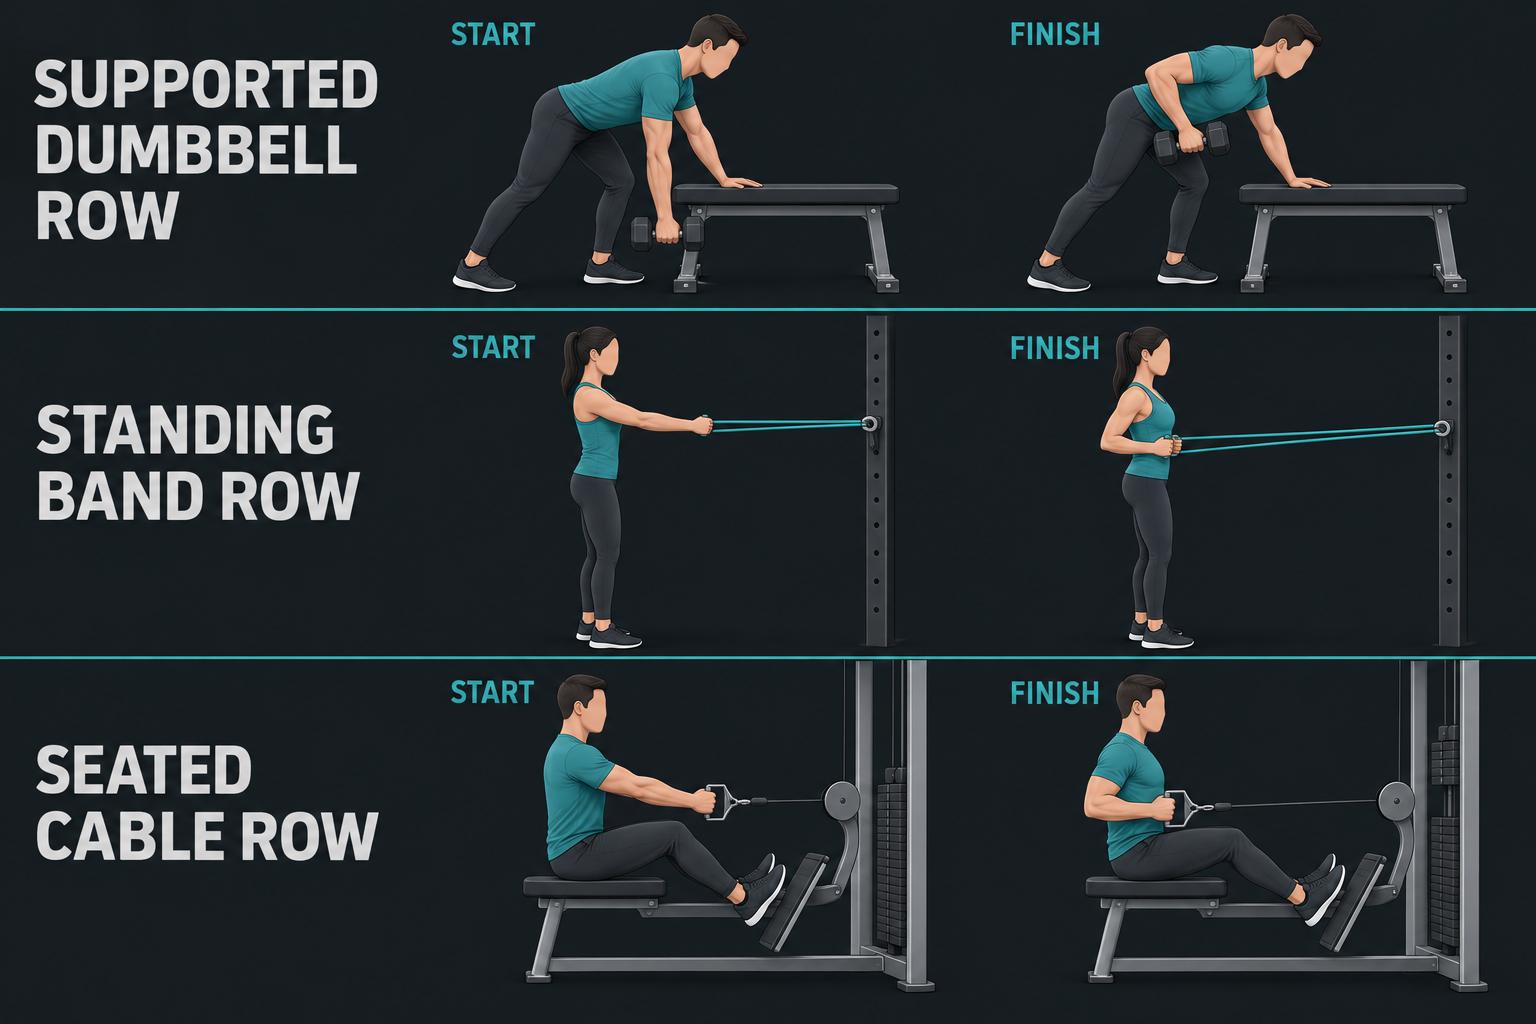
Choose one pulling option. Keep your torso steady as your elbows move backwards.
Supported dumbbell row: Place one hand on a fixed bench or sturdy counter. Set your feet apart and hinge forwards with a comfortable, steady back. Let the other arm hang with the weight. Pull your elbow towards your hip, bringing the dumbbell beside your lower ribs, then lower slowly. Complete both sides.
Standing band row: Anchor an undamaged band at lower-chest height using a suitable secure anchor. Stand tall with knees soft and arms reaching forwards. Pull your elbows back beside your ribs, then return slowly. Keep your feet and torso still; do not lean back to finish the pull.
Seated cable row: Sit tall with knees slightly bent and feet on the supports. Pull the handle towards your lower ribs, keeping elbows close, then let your arms reach forwards again under control. Avoid rocking backwards and forwards.
Choose resistance: Finish each repetition without shrugging, jerking or twisting. With both-arm band or cable rows, 8–12 pulls complete the set; there is no separate left/right set.
Day A · Standing calf raise
2 sets of 10–15 repetitions
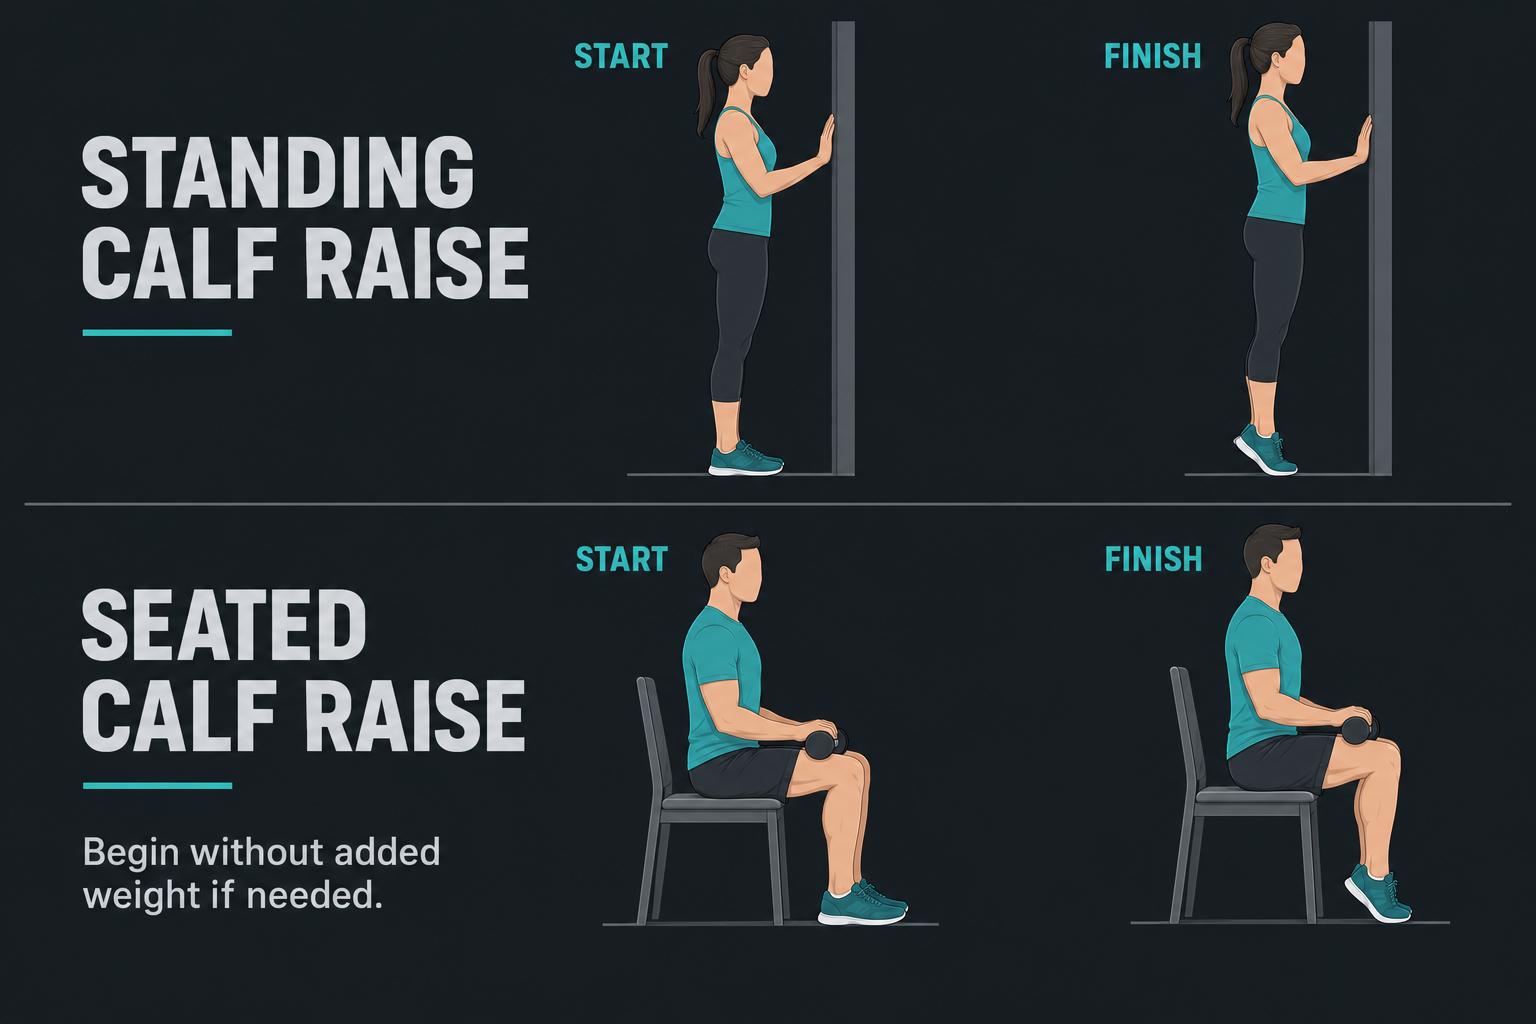
Lift your heels smoothly, then lower them. Begin on level ground.
Standing start (Day A): Stand with feet about hip-width apart and both feet flat. Rest your fingertips on a wall or fixed support for balance. Keep your knees straight but relaxed.
Lift and return: Rise onto the balls of both feet, lifting your heels as far as feels comfortable. Pause briefly, then lower slowly to the floor. Keep your ankles steady rather than rolling onto the outer edges of your feet.
Seated version (Day B): Sit on a sturdy chair with knees bent roughly to right angles and feet flat. Lift both heels while keeping the balls of your feet planted, then lower smoothly. Keep your thighs aligned with your feet.
Add resistance: For the seated version, hold a light weight securely across the lower thighs, just above the knees, with padding if needed. Begin without it. For standing raises, first make the existing range smooth and controlled.
Count: One heel lift and controlled lowering is one repetition. A smaller comfortable lift is a valid starting point; do not bounce.
Day A · Dead bug
2 sets of 5–8 repetitions per side
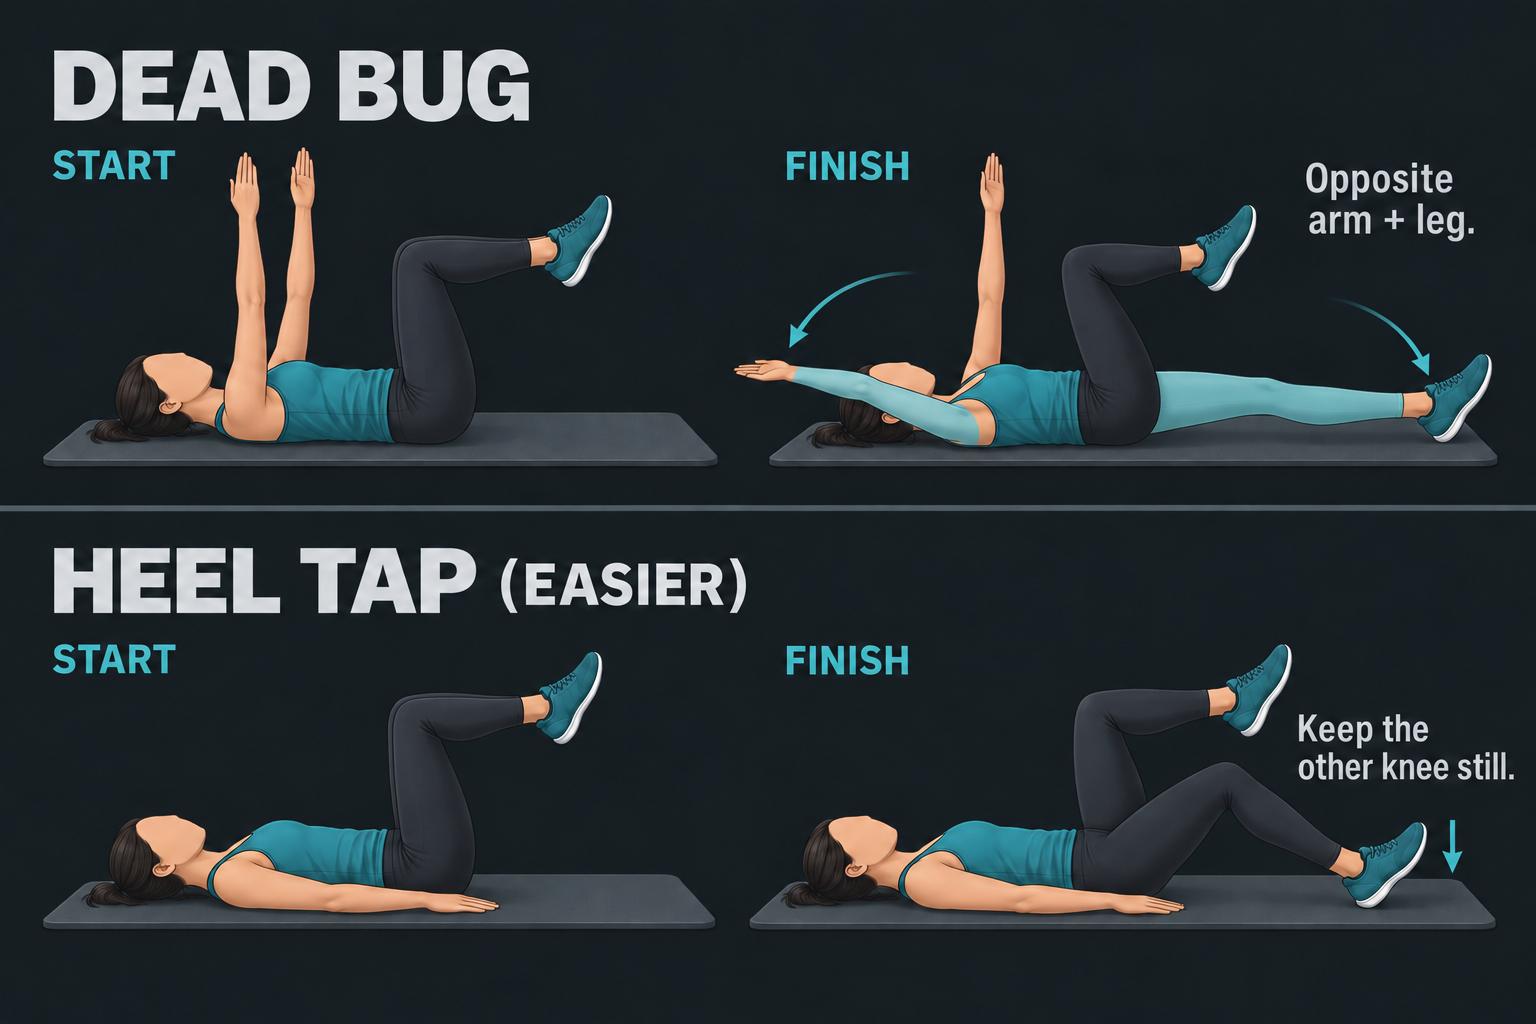
Move opposite limbs in the dead bug. The heel tap keeps the arms on the floor.
Dead bug start: Lie on your back. Reach both arms towards the ceiling. Lift your knees over your hips, bent to about 90 degrees, with shins roughly level. Gently brace your tummy while breathing normally.
Move and return: Slowly reach your right arm overhead while extending your left leg away. Stop before your lower back starts to arch or your pelvis rocks. Return to the starting position, then change sides. Each reach and return is one repetition on that side.
Easier heel tap: Rest your arms on the floor beside you and start with both knees raised and bent. Keep one knee still while lowering the opposite heel to touch the floor gently, retaining a bent knee. Lift it back and alternate sides.
Keep it manageable: You do not need to reach the floor in the full dead bug. Shorten the reach, keep the moving knee more bent or use the heel tap if control slips. Keep your shoulders relaxed and your head resting on the mat.
Day B · Romanian deadlift
2 sets of 8–10 repetitions
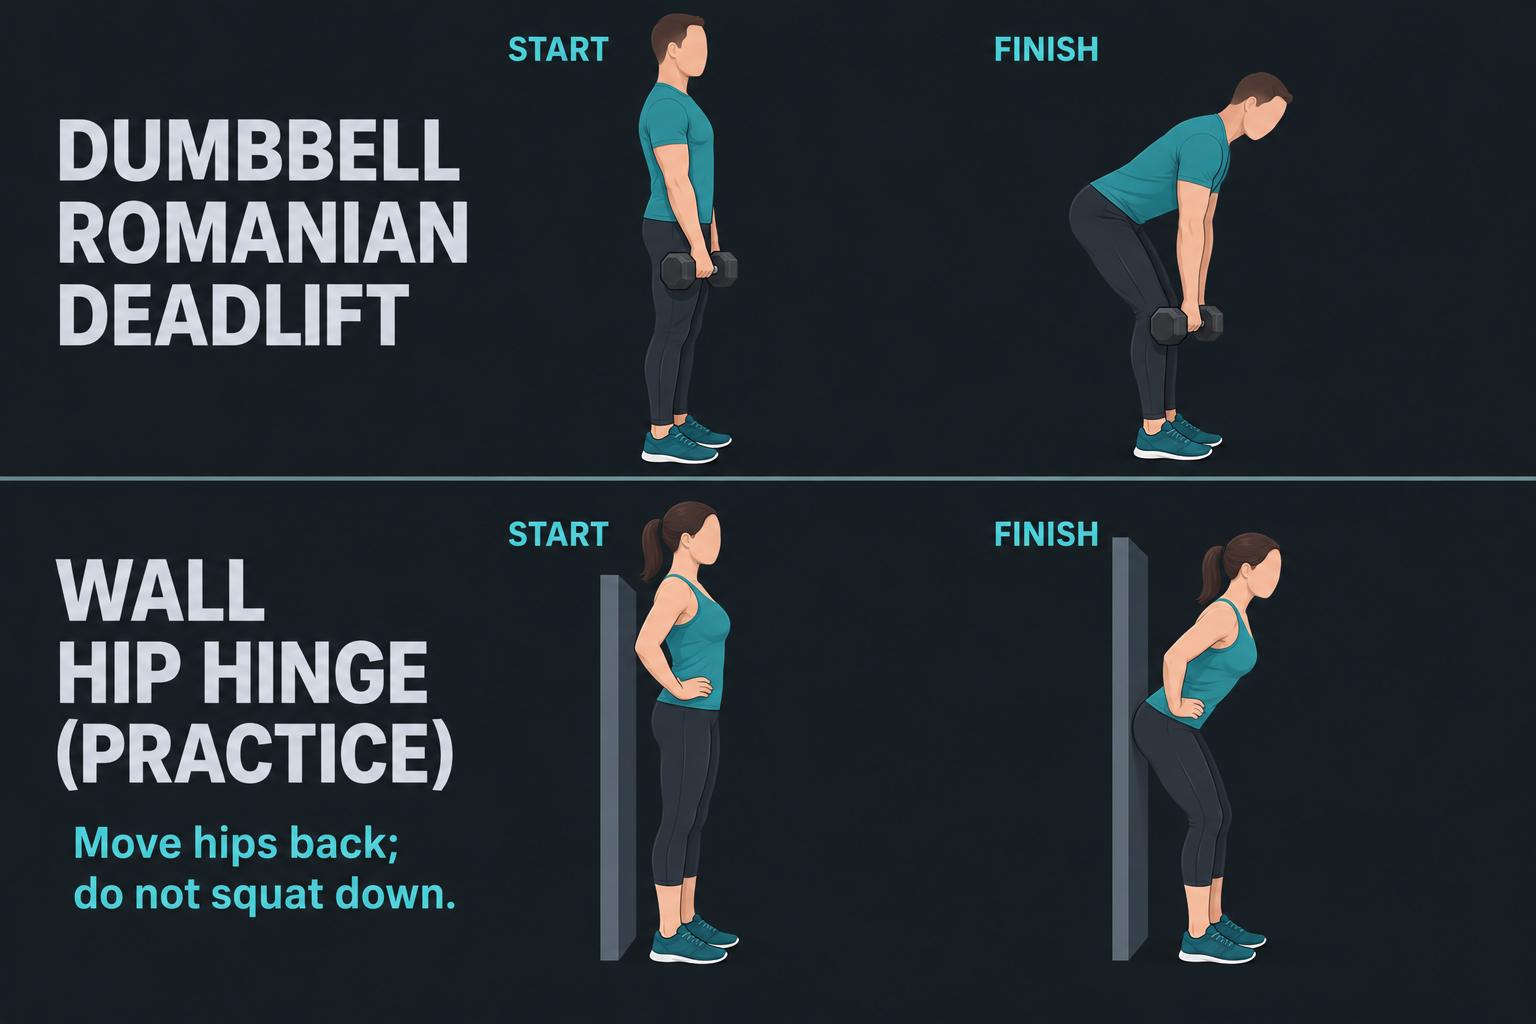
The hinge moves your hips backwards. The weights stay close to your legs.
Practise at the wall: Stand facing away from a wall, heels roughly 15–20 cm from it. Soften your knees. Push your hips backwards until your bottom touches the wall, allowing your torso to tip forwards. Keep your back shape steady, then stand. Adjust the distance so you can reach without losing balance.
Add dumbbells: Stand with feet about hip-width apart, holding weights in front of your thighs. Keep a small bend in your knees and move your hips back. Let the weights travel close down your legs as your torso inclines.
Return: Stop when you feel a comfortable stretch at the backs of your thighs, or before your back begins to round. Push through your feet and bring your hips forwards to stand tall. Do not lean backwards at the top. Lowering and standing once is one repetition.
Easier: Use no weights and a shorter range. You do not need to reach the floor. If the hinge remains unfamiliar, use the glute bridge while learning it.
Day B · Step-up or split squat
Choose one option: 2 sets of 6–10 repetitions per leg
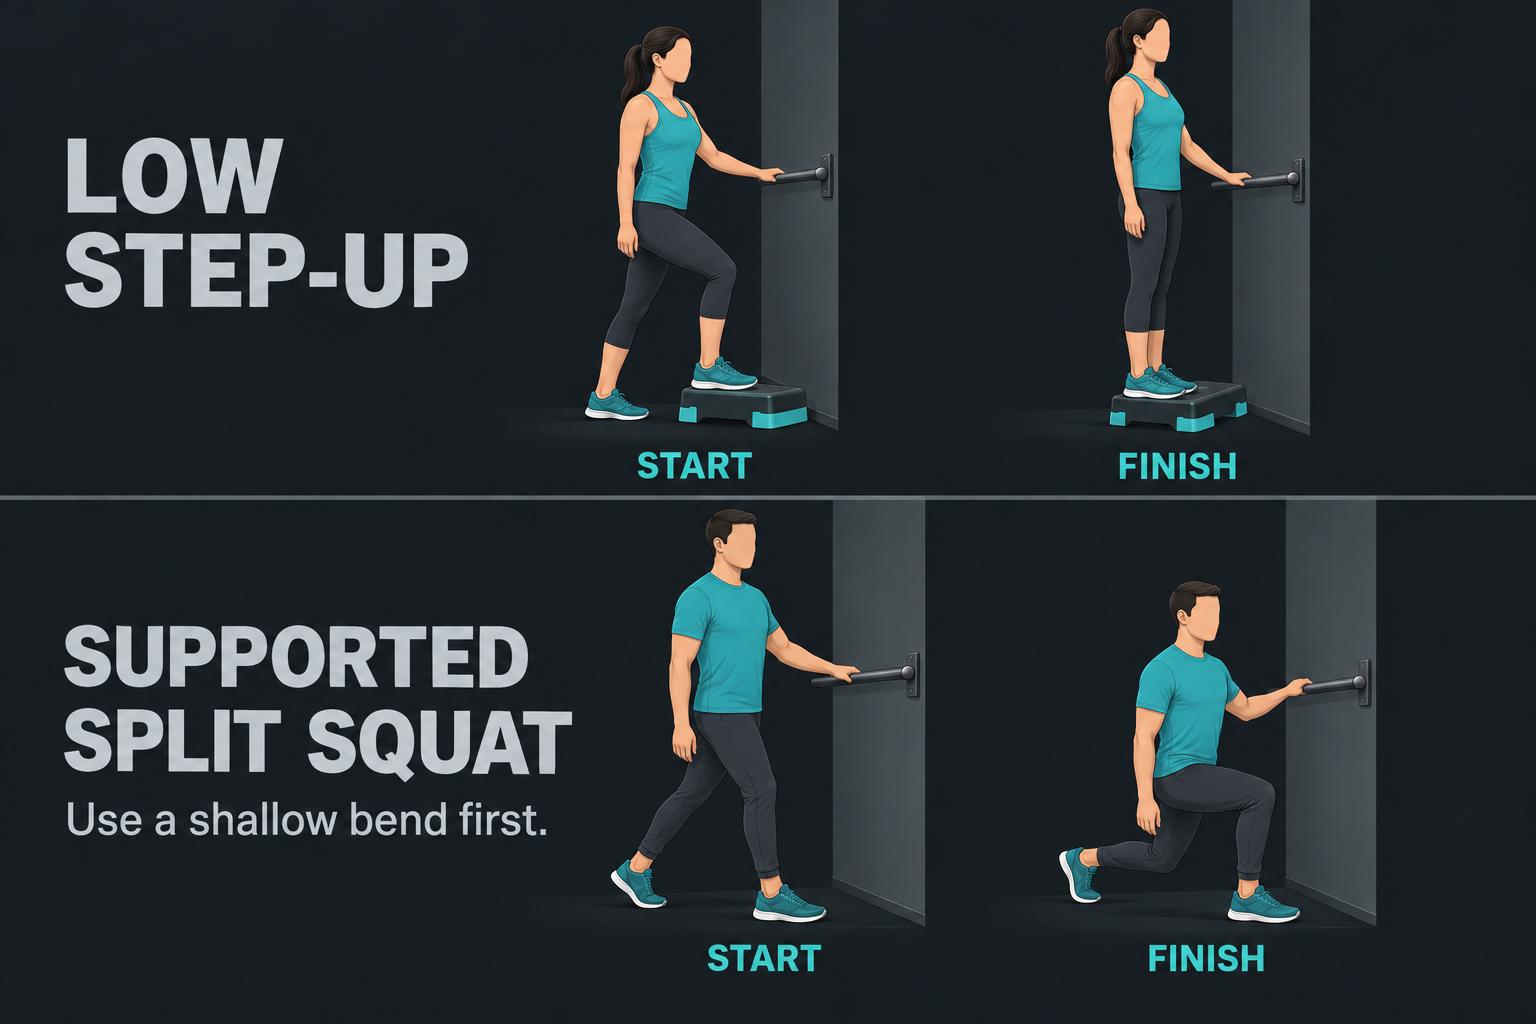
Use a stable low step or a shallow split squat, with a fixed hand support.
Step-up start: Put your whole leading foot on a low, solid step. Hold a fixed rail lightly for balance. Choose a height you can manage without pushing hard from the trailing foot.
Step and return: Press through the leading foot to stand on the step, bringing the other foot up beside it. Step that trailing foot back to the floor slowly, keeping the leading foot planted. This is one repetition for the leading leg. Finish the set, then change legs.
Split-squat option: Stand in a staggered stance with both feet on the floor, front foot flat and back heel lifted. Hold a fixed support. Bend both knees to lower your body a short distance, then press back up. Keep your feet in place and front knee following your toes. Repeat, then swap your stance.
Easier: Lower the step or shorten the split-squat bend. The back knee does not need to touch the floor. Use enough hand support to stay balanced, without pulling yourself through the movement.
Day B · Press-up or chest press
Choose one option: 2 sets of 6–12 repetitions
Wall press-up, counter press-up or machine chest press: choose one pushing exercise.
Repeat the version you used on Day A. The options are shown again here for convenience.
Wall press-up: Place your hands on a wall at about chest height, slightly wider than your shoulders. Step back until your body leans towards the wall. Bend your elbows to bring your chest closer, then press away. Keep your body moving as one unit, without sagging at the hips.
Counter press-up: Use the same movement with hands on a fixed, sturdy counter. Walk your feet back so your body forms a straight sloping line. Lower your chest towards your hands, elbows angled back rather than flared sideways, then press up. A higher hand position is usually easier.
Machine chest press: Adjust the seat so the handles sit around mid-chest height. Keep your back supported and feet flat. Press the handles forwards without snapping your elbows straight, then return slowly without letting the weights crash.
Count: One controlled lowering-and-pressing cycle is one repetition. For the machine, press out and return once. Ask for help adjusting an unfamiliar machine.
Day B · Row
2 sets of 8–12 repetitions; each side for the one-arm row
Choose one pulling option. Keep your torso steady as your elbows move backwards.
Repeat the version you used on Day A. The options are shown again here for convenience.
Supported dumbbell row: Place one hand on a fixed bench or sturdy counter. Set your feet apart and hinge forwards with a comfortable, steady back. Let the other arm hang with the weight. Pull your elbow towards your hip, bringing the dumbbell beside your lower ribs, then lower slowly. Complete both sides.
Standing band row: Anchor an undamaged band at lower-chest height using a suitable secure anchor. Stand tall with knees soft and arms reaching forwards. Pull your elbows back beside your ribs, then return slowly. Keep your feet and torso still; do not lean back to finish the pull.
Seated cable row: Sit tall with knees slightly bent and feet on the supports. Pull the handle towards your lower ribs, keeping elbows close, then let your arms reach forwards again under control. Avoid rocking backwards and forwards.
Choose resistance: Finish each repetition without shrugging, jerking or twisting. With both-arm band or cable rows, 8–12 pulls complete the set; there is no separate left/right set.
Day B · Seated calf raise
2 sets of 10–15 repetitions
Lift your heels smoothly, then lower them. Begin on level ground.
Standing start (Day A): Stand with feet about hip-width apart and both feet flat. Rest your fingertips on a wall or fixed support for balance. Keep your knees straight but relaxed.
Lift and return: Rise onto the balls of both feet, lifting your heels as far as feels comfortable. Pause briefly, then lower slowly to the floor. Keep your ankles steady rather than rolling onto the outer edges of your feet.
Seated version (Day B): Sit on a sturdy chair with knees bent roughly to right angles and feet flat. Lift both heels while keeping the balls of your feet planted, then lower smoothly. Keep your thighs aligned with your feet.
Add resistance: For the seated version, hold a light weight securely across the lower thighs, just above the knees, with padding if needed. Begin without it. For standing raises, first make the existing range smooth and controlled.
Count: One heel lift and controlled lowering is one repetition. A smaller comfortable lift is a valid starting point; do not bounce.
Day B · Suitcase carry
2 sets of 20–30 seconds per side
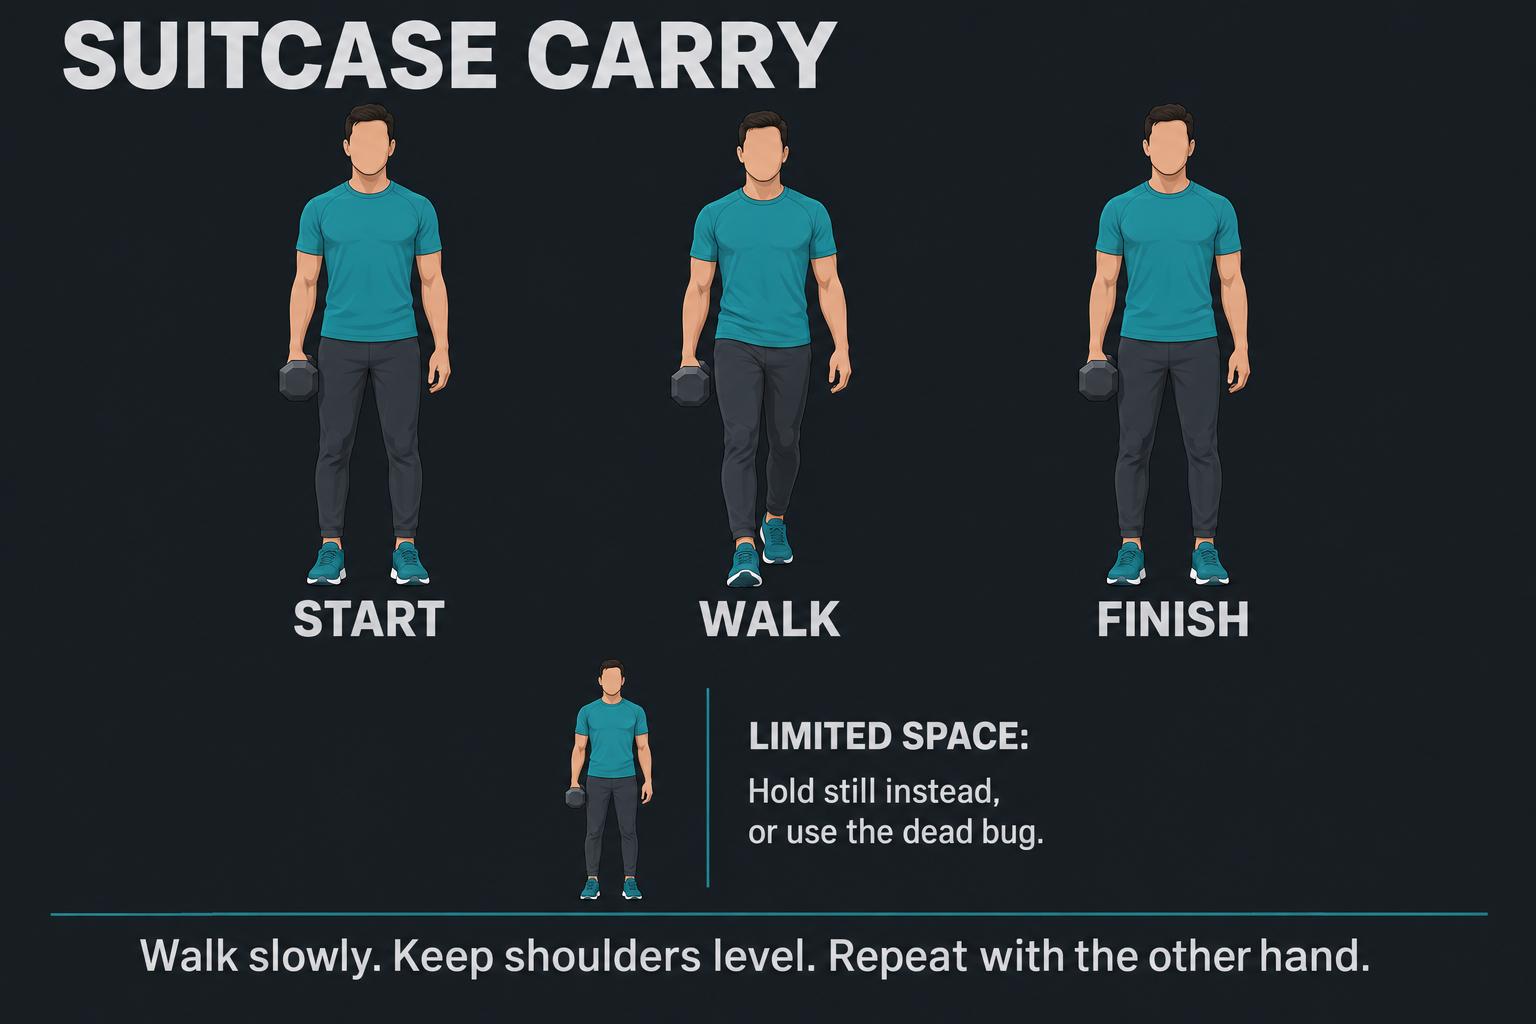
Start: Pick up a manageable dumbbell and hold it beside one thigh. Stand tall, shoulders level, with the free arm relaxed. Choose a clear, level path.
Walk: Take small, unhurried steps while keeping your ribs over your pelvis. Resist leaning towards or away from the weight. Keep breathing; avoid shrugging the carrying shoulder or gripping until your hand fails.
Finish: Stop walking, then put the weight down under control. Repeat with the other hand. One timed walk on each side completes a round; build towards two rounds.
Easier: Use a lighter weight or a shorter walk. If you cannot stay upright, end the set rather than leaning to complete the time.
Limited space: Stand still holding the weight at your side for a shorter comfortable period, then change hands. Alternatively, repeat the dead bug from Day A. Choose one option; you do not need the carry, hold and dead bug together.
Fit strength around the running week
Begin with the runs you already tolerate. There is no need to add speed work because you have started lifting. The example below uses two easy runs and one longer easy run; “longer” means longer for you, not a particular mileage target.
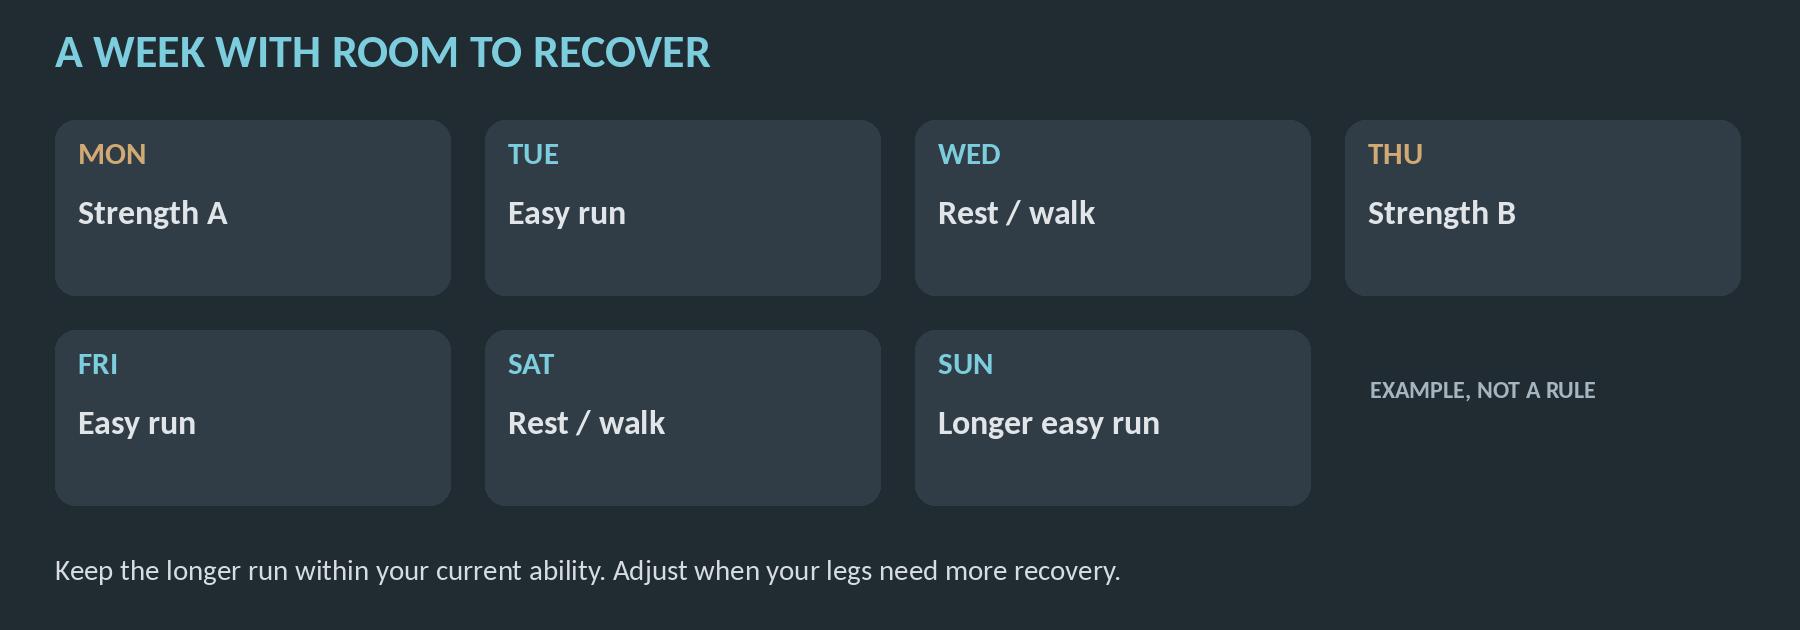
One possible arrangement. Move sessions when recovery or everyday commitments require it.
Monday follows Sunday’s longer run, so only lift then if you have recovered sufficiently. If your legs remain tired, shorten that strength session, shift it or use a different weekly arrangement. Likewise, keep Tuesday and Friday genuinely easy if the previous day’s lifting is noticeable.
If you can already run two miles at a comfortable pace and want to work towards a longer distance, our beginner 10K training plan offers a structured next step. Build gradually, allow time for recovery and adjust your progress to how you feel.
👉 Explore the beginner 10K training plan
Running and lifting on the same day
Doing both on the same day can leave more days available for recovery. A review found that combining aerobic and strength training generally did not reduce gains in maximal strength or muscle growth. However, improvements in explosive strength—such as the ability to produce force quickly—may be affected when running and lifting are performed in the same session. [4]
Another review found that lifting before aerobic exercise produced greater improvements in lower-body strength, but neither order was better for reducing body fat. [5] When combining them, perform your priority session first: run first when protecting an important workout, or lift first when strength is the main goal and the planned run is easy. If practical, allow several hours between sessions, although the evidence does not support a universal six-hour rule.
My earlier multigym sessions fitted alongside speed-run days, but that does not tell us everyone should copy the arrangement. The useful question is whether you can do both sessions well and recover for what comes next.
Progress without letting fatigue take over
Keep a brief record of each exercise, the weight used, the repetitions completed and how your next run felt. When you reach the top of the repetition range with good control and feel you could manage another two or three repetitions, increase the weight slightly. For example, if your range is 8–12 repetitions and you can comfortably complete 12, use a slightly heavier weight and aim for 8. Gradually work back towards 12 as you get stronger.
Progress may also mean performing the movement with better control, balance or confidence; it does not always require more weight, repetitions or sets. Change only one element at a time and repeat the same week when necessary. Your recovery matters more than keeping to an arbitrary timetable.
What my GVT diary actually says
In December 2016 I began recording German Volume Training (GVT), a demanding, high-volume method usually built around ten sets of ten repetitions for the main exercises, with fewer sets for the supporting movements. In my version, two principal exercises often followed the 10 × 10 format, while others used around five or six sets of ten. By January, lifting had become the priority and my running had reduced. This was very different from adding a manageable amount of strength work to support running.
Memory had softened the difficult bits. On 6 January I recorded heavy legs after the previous day’s GVT; the next day they were still “fried”. A week later I wondered whether another sluggish run was connected with leg training. There were better sessions too, and I eventually completed my bench-press target, but the diary is clear: I was making adjustments, not floating through every workout unaffected.
That experience is why I would start a runner with much less volume. The lesson is not that demanding lifting and running can never coexist. It is that the amount of each should reflect which matters most, and what you can recover from.
Soreness is information
Soreness after unfamiliar exercise commonly peaks a day or two later, sometimes around the third day. It is not a score for how productive the session was. [6] If it changes your stride, makes stairs unusually difficult or repeatedly spoils your runs, reduce the next leg session or change its placement in the calendar.
Persistent, worsening or sharply localised pain deserves a different response from general muscle tenderness (if it ‘yelps’ at you, call for help). Stop the provoking exercise and seek appropriate advice rather than assuming all discomfort is normal soreness.
My current activity includes running, cycling, dog walking and regularly lifting grocery totes at work. I also perform exercises prescribed by my physiotherapist for GTPS. All this activity places demands on my body, so I consider it when deciding how much additional strength training I can recover from. Physical work and rehabilitation contribute to the overall workload, although they do not necessarily provide the same benefits as a balanced strength programme.
Questions before you begin:
What if the scales do not move?
Judge the trend over several weeks rather than a few weigh-ins. Strength training can temporarily increase water retention and muscle swelling, while fat loss and the preservation or growth of lean tissue may occur without much change in total weight. [1,6] Also consider waist measurements, clothing fit and strength.
I experienced this in February–March 2017, when I recall becoming leaner and more muscular despite little change in my weight. However, I had changed both my diet and training, so I cannot separate the effects of GVT and keto or assume another runner would respond similarly.
Should I keep lifting during marathon training?
Often you can, but the balance may need to change. Keep familiar exercises and consider fewer sets, shorter sessions or a maintenance phase as running demands rise. You may also need to reconsider whether active weight loss belongs in your hardest training block.
Eating too little can limit muscle growth even when strength improves, and prolonged under-fuelling can affect health and performance. [7,8] If you remain tired, your runs deteriorate or recovery takes longer, review how much you eat and train. Finding the right balance takes some adjustment, but persistent fatigue is a signal to make changes rather than push harder.
What if I can only manage one session?
Use that as a starting point. A shorter whole-body session can help establish the habit; add a second when it fits. Avoid squeezing two demanding sessions into a week that already leaves you struggling. The longer-term aim is consistent, progressive work you can recover from.
Your next step
Choose two possible strength slots and try the easier versions of the exercises. Note how your legs feel during the following runs. Build from that response rather than trying to complete an impressive-looking week on paper.
That is where the 3 foundations—physical strength, mental strength and knowledge—come together: building a stronger body, maintaining focus and motivation through setbacks, and understanding when to progress or allow time for recovery.
For more on how nutrition, running and recovery work together to support weight loss, explore my running to lose weight guide.
Running Injuries Hub
Learn what commonly causes running injuries, when pain is a warning sign, and how to return to running without rushing the process.
👉 Explore the Running Injuries Hub here
References used:
[1] Binmahfoz et al. (2025). Resistance exercise during dietary weight loss.
25 trials: body composition and strength; not runner-specific.
[2] Currier et al. / ACSM (2026). Resistance training prescription in healthy adults.
Updated position stand on frequency, effort and different training approaches.
[3] Llanos-Lagos et al. (2024). Strength training and running economy.
Benefits vary with training method, running speed and participant training level.
[4] Schumann et al. (2022). Compatibility of aerobic and strength training.
43-study synthesis; distinguishes maximal strength, muscle growth and explosive strength.
[5] Eddens et al. (2018). Exercise sequence in concurrent training.
Lifting-first advantage for dynamic leg strength; no demonstrated body-fat advantage.
[6] Wiecha et al. (2024). Physical therapies for delayed-onset muscle soreness.
Background on soreness, swelling and the time course after unfamiliar exercise.
[7] Murphy & Koehler (2022). Energy deficiency and resistance-training adaptations.
Energy deficits can impair lean-mass gains without preventing strength gains.
[8] Mountjoy et al. / IOC (2023). Relative Energy Deficiency in Sport consensus.
Health and performance implications of problematic low energy availability.
